There is the old saying … “don’t hide your light under a bushel” … so I wanted all of the work on the steam engine to be at least a bit visible. Since the Grazyna is supposed have been built c.1880’ish .. a Skylight seemed to make sense. The British warship Inflexible was the first to install electric cables in 1880. Arguments for the use of oil based lamps continued as late as 1921 in an issue of Nautical Gazette. At some point therefore, I think I will put in some “oil lamps” to illuminate the engine compartment.
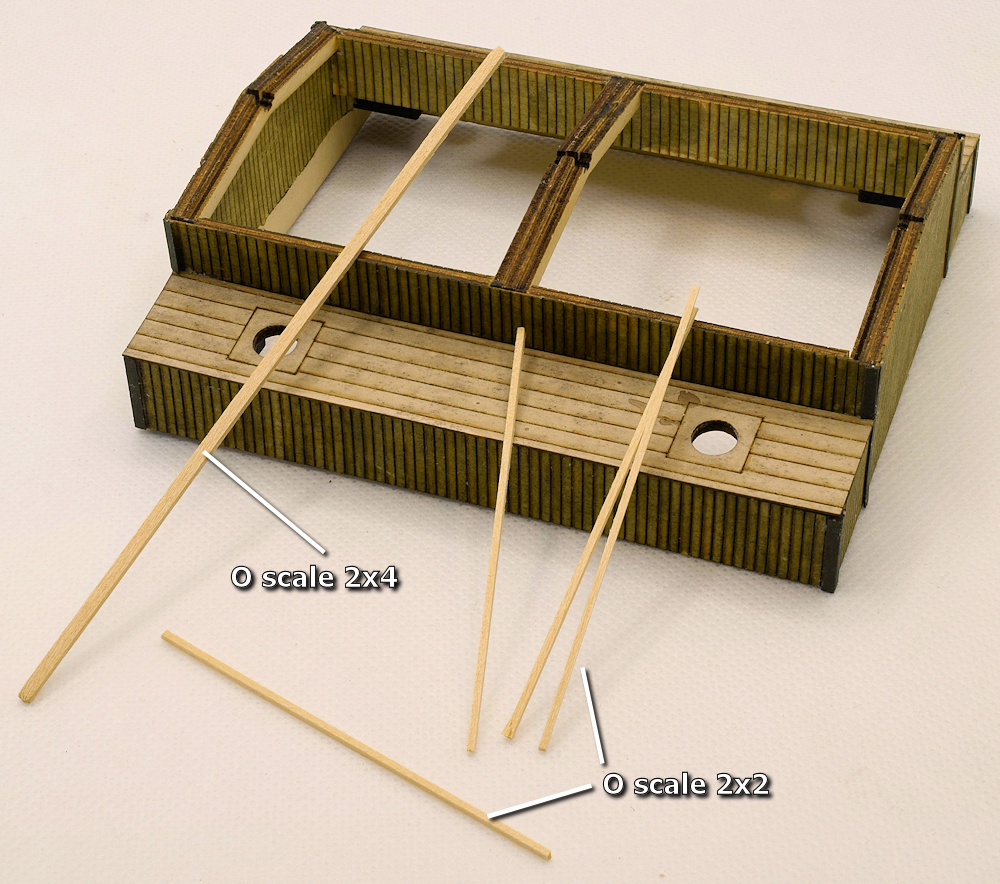
For the Grazyna I have created “pockets” to hold the “glass” (0.010″ clear styrene). These pockets are formed by gables at either end (0.010″ shorter than the end walls), the exterior wall, the ridge pole and O scale 2x2s. The only thing that the viewer will see will be the top of the ridgepole .. so that needs to be painted to match the trim. Said trim will cover the “glass” edges from sight.
I am attempting to assemble this skylight in such a way that it looks scale with the bits and bobs looking neat.
Here I am test fitting the O scale 2×4 Ridgepole which runs the length of the Skylight fitting into slots in the gables. It stops against the end walls just shy of the Laserboard overlays.
The four O scale 2×2’s fit into notches in the gables angled at the same 9.2° as the gables. These become the seats for the ends of the “glass” with the ridgepole acting as a stop.
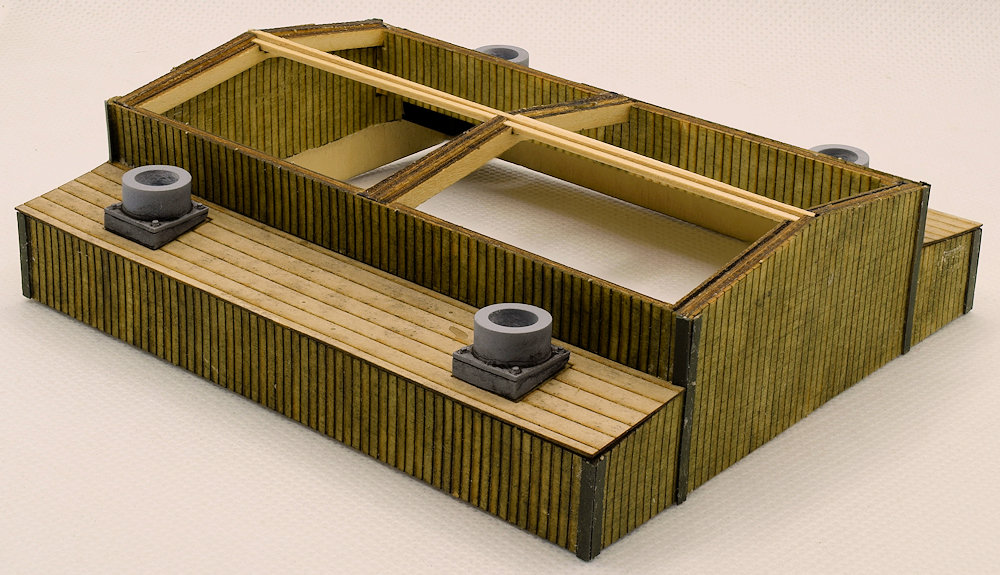
I glued the 3d printed bases for the Cowl Ventilators in place. I sprayed them with gray primer and used a bit of Mig Dark Wash to add “character”. I will keep the Cowl Ventilators in a safe place until the model is completed .. otherwise I can guarantee they would get broken at some point during the build.
The idea is that all the bits and bobs will slot together like a kit. I … *think* … this will work .. fingers crossed.
The O scale 1×4 Ridgepole stretches the length of the model while the O scale 2×2 run from the ends to the center.
Like I said earlier, I will paint the Ridgepole to match the trim. The 2×2’s will not be seen … probably … but I think I will stain stain them with same Vetero Murky Brown I used for the sponson roofs. Those I think will be tarpapered with some of the “boards” showing.
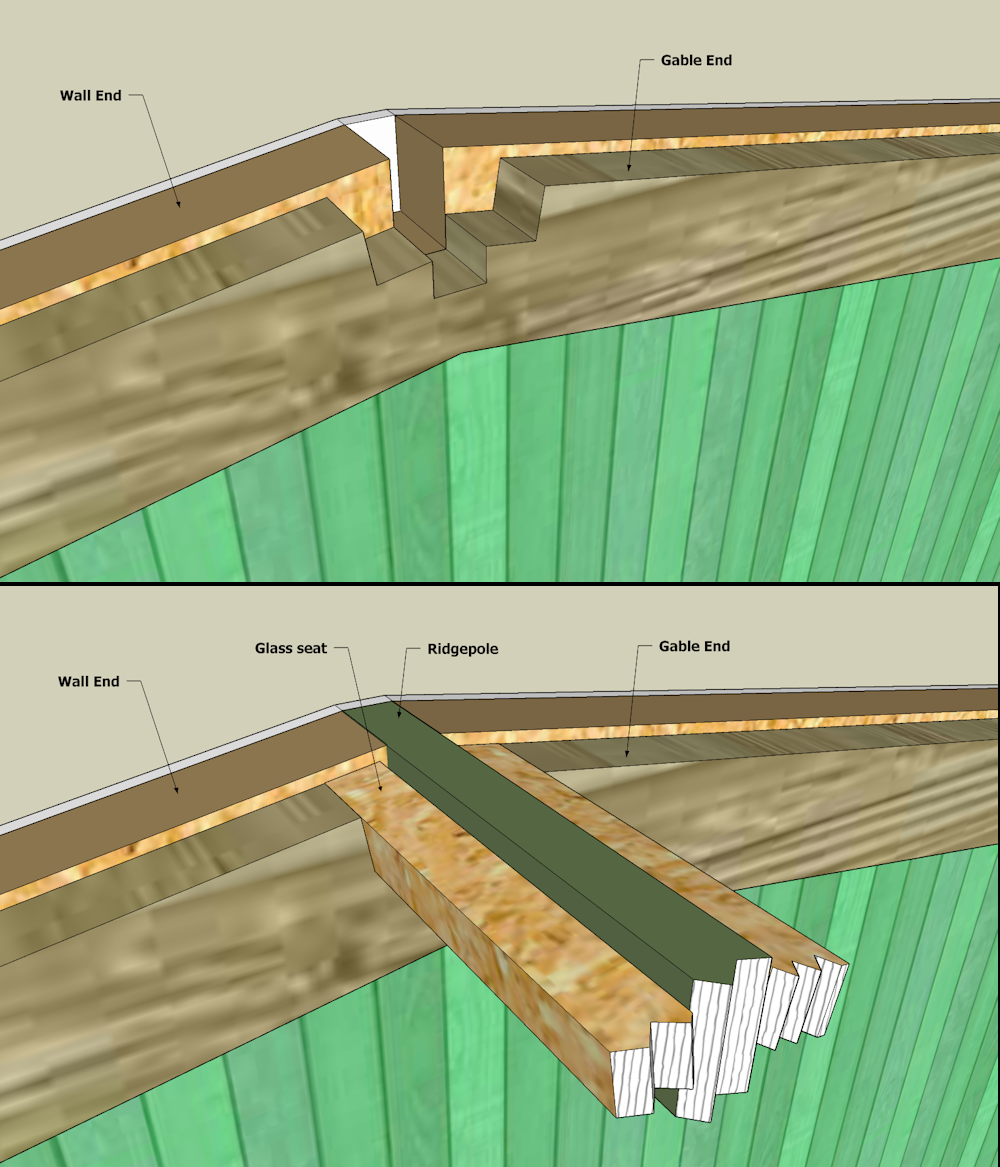
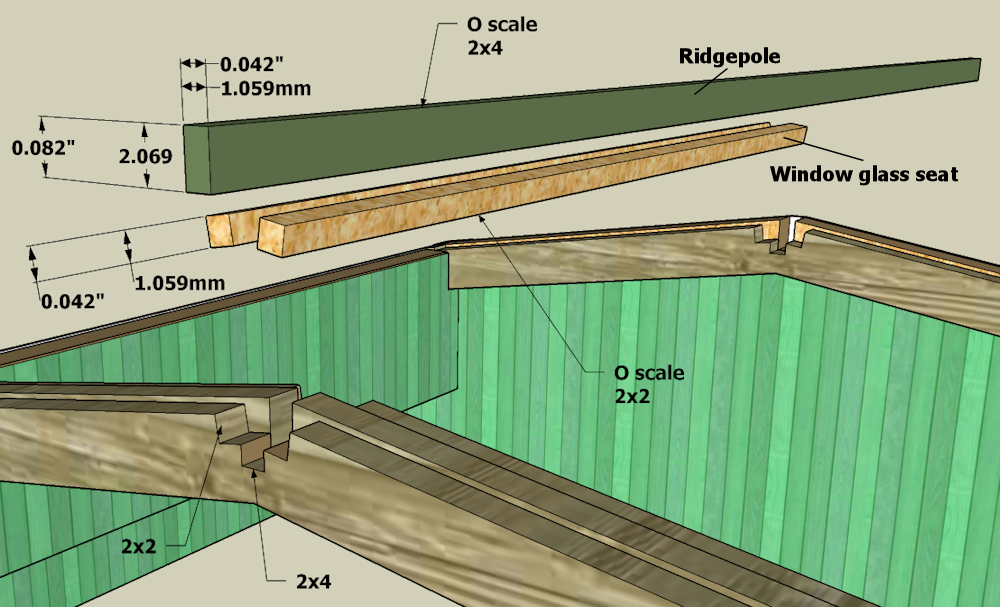
This is a look at how the Ridgepole and Glass Seats fit. The O scale 2×4 Ridgepole fits into a slot in both the Wall End and the Gable End pieces. The Laserboard overlay hides the end of the piece of wood.
The two O scale 2×2 stripwood fit into 9.2° angled slots in the Gable End. Notice how the 2×2 align with the top of the Gable End with the O scale 2×4 Ridgepole forming the top of the pocket for the “glass” (0.10″ clear styrene sheet).
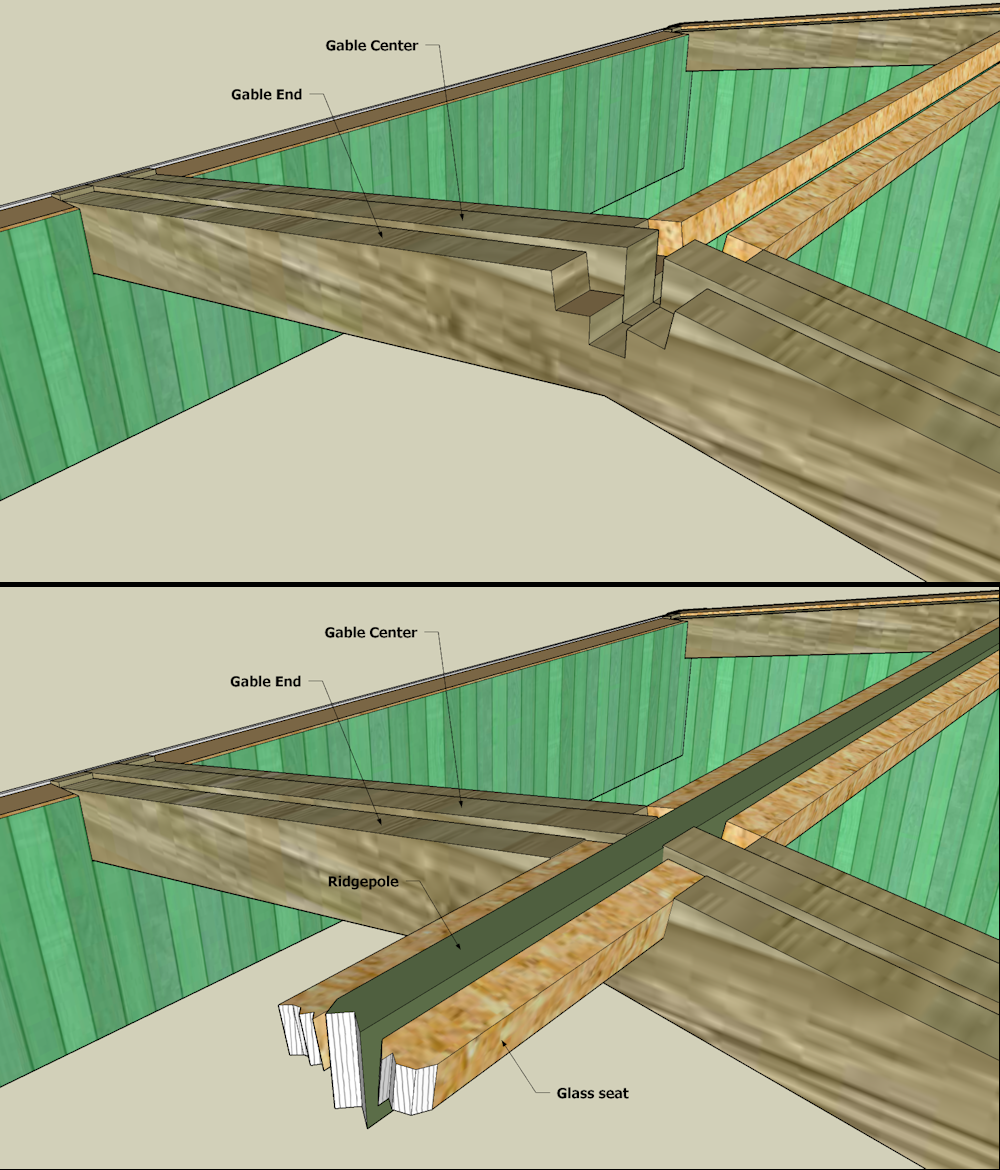
In the center I have two of the Gable Ends sandwiching a gable with just the slot for the Ridgepole. This assembly once again creates a pocket for the “glass”.

The Skylight is this glassed in roof over the Engine Room. If I were quite a be more mad than I am I might have used microscope slide cover glass and installed the panes individually into the framing. Luckily while I am without a doubt a bit crazy .. I am not quite that nuts.
The Skylight will sit on top of the framing shown previously. This is the framed Skylight and since “not that nuts” was in effect I had to find another way to get the effect I wanted.
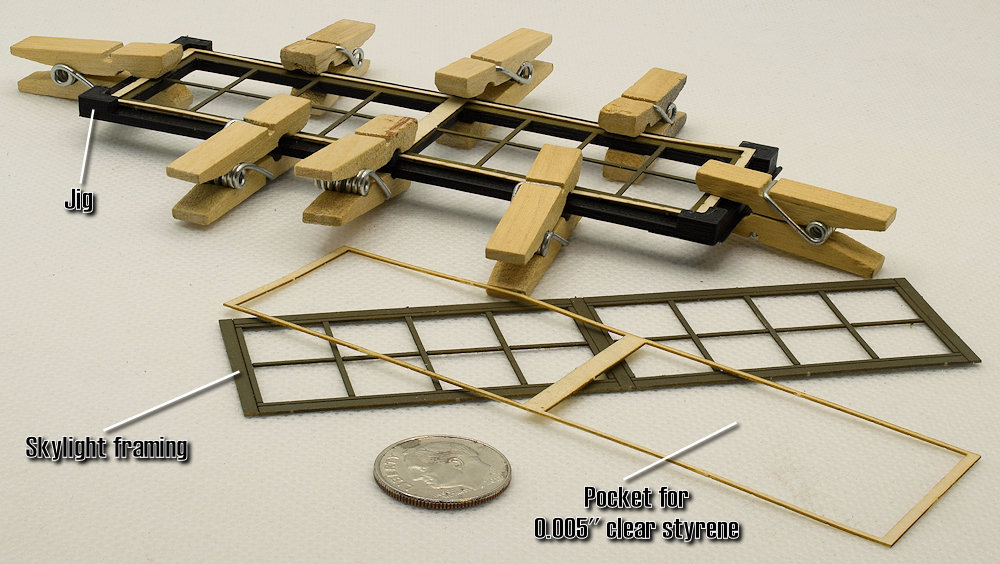
The topmost section is the trim and all the window framing – stiles, muntins, rails etc. I could etch all the “joints” in the 0.015″ Laserboard. I then made a frame to act as pockets for the “glass” .. the same outside dimensions as the trim. The 0.005″ clear styrene could then be glued .. very carefully .. into the pockets.
We modelers know that one of the things we have to deal with is aligning “stuff”. I model in On30 so I think any misalignment seems magnified.
I printed a jig to hold the Skylight Framing and the Pocket Framing aligned while gluing up. I brushed white glue across the face of the Pocket Frame with a Horsehair Bristle Acid Brush I got from Harbor Freight – 36 ea for $3 so only .50¢ each .. nice sturdy brushes you can use and toss.
The little clothespins were picked up at Hobby Lobby .. supposed to be “novelty” but work well for modeling.
Pause for an intermission: See where we are at this point.
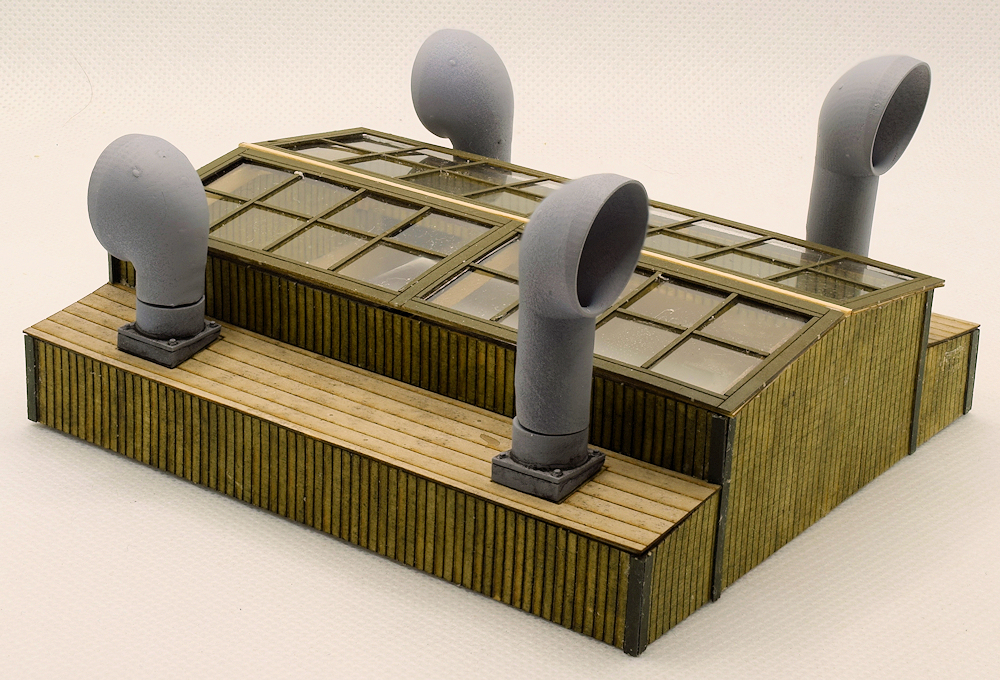
- I glued the clear Styrene in place using some Canopy Glue and waited three hours before handing .. gently. The glue says wait 24 hours so … gently until tomorrow .. like dust the thing. In any case the skylight halves are just sitting for the photo.
- I placed an O scale 2×2 on top of the ridgepole. When I added the Pocket Framing for the 0.005″ clear styrene it raised everything up a bit. I will paint that green to match the other trim etc.
- The Cowl Ventilators have had some sanding and a shot of primer. Need to tidy them up with some fine sandpaper and tweak the alignment to the bases. Picked up some more gray primer today .. thinking it looks fine for the ventilator color. I still see some nibs on a couple of cowls from the supports.
- Need to add handles to the Cowl Ventilators. They had those to allow the crew to rotate them as needed. The direction the opening faced depended on wind direction … the Engine Room like shown with air rammed in through the tall ventilators and exhausting through the short ones. Ventilation of the cargo area was complicated depending on whether the ship was moving from warm to cold or cold to warm as you could have cargo sweat or ship sweat depending. Ventilating a cargo of dried fish coming from Norway to Cuba could cause mold for example (cargo sweat).
- I suspect that the four Skylight sections would be hinged at the top with a hand/latch at the bottom. Details matter …