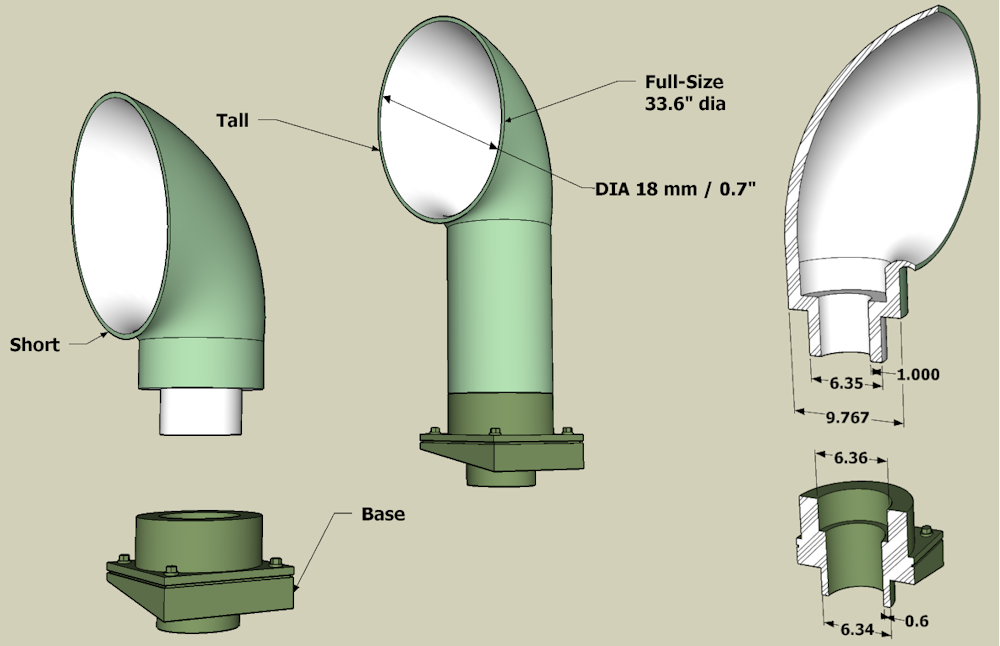
V1: I created two Cowl Ventilators a short and tall version. Full-size the cowl is 33.6″ diameter. The base was designed to fit the 9.2° slope of the sponsons. I made a small 1/4″ stubs on the bottom of the base to secure it to the roof of the sponsons.
I am retroactively calling this Version 1. I ran into minor problems with this design meaning I had to re-work a few things .. which is normal for 3d prints.
The rims were simply too thin. I made the thickness of the bell twice as thick and then tapered down to half that so I have strength but looks good still.
")
I stopped what I was doing last night to take an “In Progress” photo.
- Ventilator Base: My first test print were a bit “wonky” .. I didn’t ad enough supports for the print and had some warping. That’s fine .. I used them to locate the sponson roof overlays while the glue dried. The second set in front of the ventilators had enough supports (the two on the right show the rough supported surface). This time the problem was that I needed to modify the clearances for the ventilator stud.
- Cowl Ventilators: You can see the notch in the rim of the leftmost ventilator. It is also slightly distorted. The rim is simply too thin.
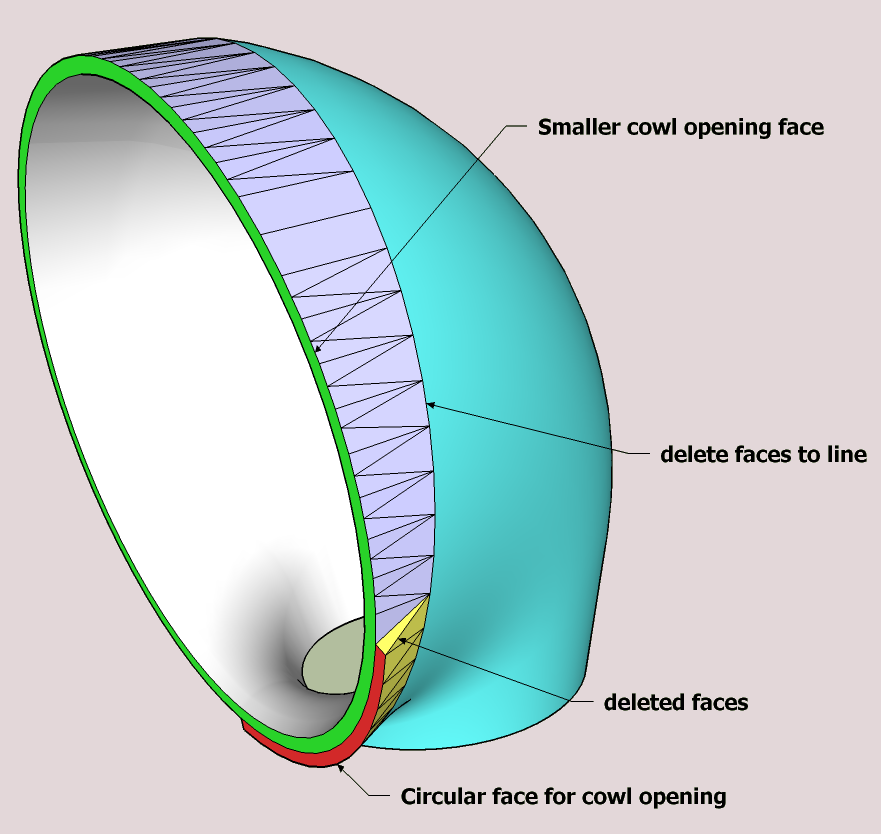
I used a plugin for Sketchup called “Curviloft – Loft by Spline … which creates loft junctions between surfaces based on spline curves”. What this means in English is that I made a circular face for the base of the Cowl .. then another circular face for the cowl opening titled forward a bit and a curve from centerline to centerline. I made that cowl opening with a ~.8 mm thickness. Once that created the ventilator cowl I went back and made circular ~ 4mm smaller on the opening face. That done I deleted faces on the forward surface of the opening and manually created a new set of faces.
- Aqua: The outer surface of the cowl.
- Green and Red: This was the original face making a ~.8 mm thick wall.
- Red and yellow: Deleted these faces which gives a ~.4 mm rim thickness.
- Purple: Manually created faces from the “delete faces line” to the “Smaller cowl opening face“

The end of all of this is shown in this graphic. The technique is similar to how military modelers thin the fenders on a tank by scraping the inside of the fender to taper that edge and make it visually thinner. I also corrected the lower end of the cowl to 6.3mm so it would easier fit the 6.4mm opening in the base. This “mostly” worked but I still had to sand a bit off of that stud so it fit easily. I also made the stud length .1mm smaller in height so clear the base depth.