
2014 – V1
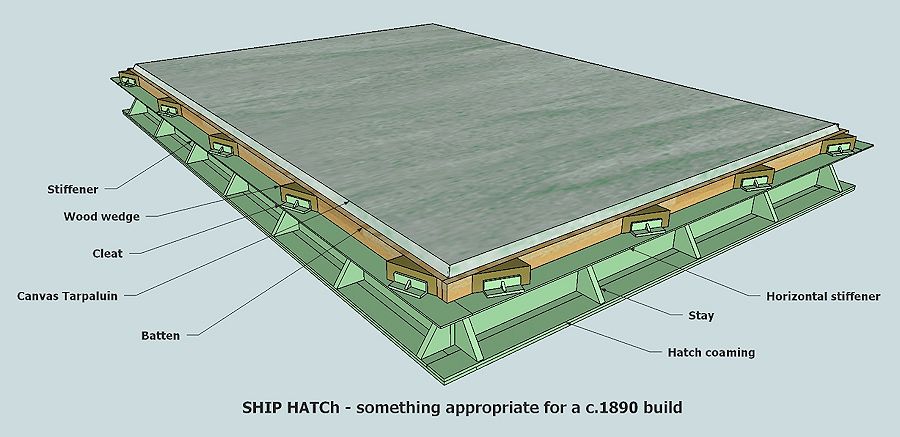
Since the Grazyna is supposed tobe a small riverine cargo ship I needed a cargo hatch. I found this drawing that I removed everything not applicable for me .. for a model. This is what I used as a guide for my own design.
This was my original design. This has been gathering dust for a long time as the original photo is from 2014. This was way before I bought my first 3d printer so everything is built from mostly Evergreen styrene shapes.
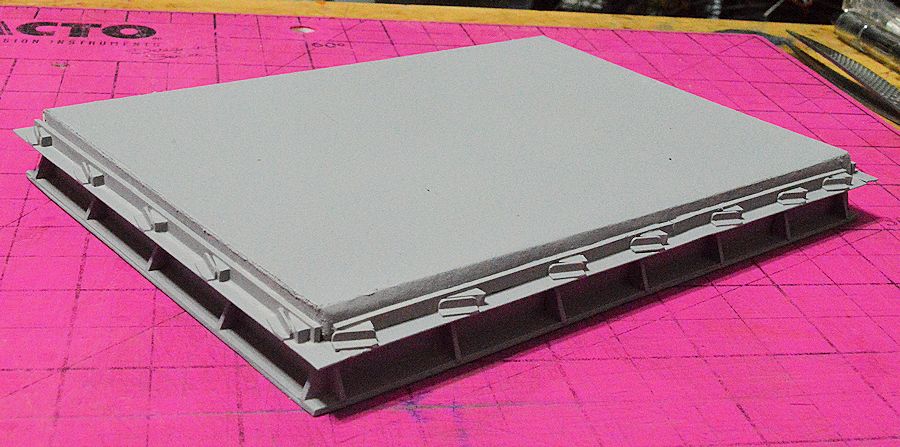
Left: The model follows pretty closely to the design above. The bit the cleats are attached to is relatively weak and a part broke off .. the impetus to re-do this “mo betta”. Looking at the simulation of a tarpaulin … I can’t remember what I used to simulate canvas .. but all in all I was quite happy with how the model came out.
2026 – V2

I wanted to re-work the hatch but using 3d prints to enhance the model. Most of it still should be made using Evergreen styrene shapes. One thing I forgot to do the first time around was to slope the top of the hatch so water would run off.
Note: Just was adding the cleats to V2 and I am thinking that the hammer for driving the wedge in should be nearby .. possibly mounted to the side of the hatch stays. That would had just a bit more interest to the scene.

If you look back at the first illustration you will see that the tarpaulin runs off the top, across a rounded section and then down the face of the coaming before being secured by the Batten by a wedge hammed in place. (this is where the term “Batten down the hatches!” come from.
The 2mm Basswood was used to laser cut the section the tarpaulin will cover. Evergreen No. 242 half-round and No. 126 strip styrene forms the rounded edge. A length of O scale 1×4 forms the Batten and the cleat and wedge can be 3d printed.
The plan is simple. The cargo hatch is made from Evergreen No. 278 5/16″ I-Beam formed into a rectangle.This is the steel opening. The bit that sticks up like a little roof – the hatch cover which has a tarpaulin secured over it to keep the water out. Since covering with something to look like a tarp will add to the length and width of the tarped section, however thin a material used. It makes sense then to make that first and then fit the I-Beam to the finished hatch cover.
On a side note I guessed that a tarpaulin would be 1//16″ or so thick. Tossing guessing aside I looked online and found that …. “Tarpaulins used on cargo ships and in marine environments are generally heavy-duty to extreme-duty, ranging from 0.55mm to over 2.0mm in thickness.“
In O scale .. 1:48 .. that .55mm = 0.022″ to the 2.0mm = 0.080″ .. so I was with the range for the heavier tap after all. When you reduce that to 1:48 the range drops down to 0.00045″ to 0.0015″ .. say .. half the thickness of a human hair or standard copy paper. I am just going to call it .. SMALL!. Tissue paper .. the type used for delicate gift wrapping is around that 0.0004″ thickness with the crafting type running around 0.0014″ .. meaning that .. yeah .. tissue paper would be the proper thickness for O scale. Crazy!
I experimented a bit with tissue paper .. put it in a separate page under the Multifarious parent – Tissue Paper